Showing posts with label #GetHistoryintoyourlives. Show all posts

Sunday, December 18, 2016

Tasting History with Martha Washington’s Great Cake Recipe

By Margaret Duncan, Ed.D.

Recently, I was able to visit Mount Vernon and meet Martha Washington. Okay, so it wasn’t really her but a reenactor instead.  However, while in the dining room, she shared her Great Cake recipe with us.  The recipe shared is one of the few recipes that have survived that are directly associated with Mrs. Washington.  Legend has it, the Great Cake was so well liked that she had her granddaughter, Martha Parks Custis copy it down to give out to other family members.  The Great Cake, as it was called is a basic fruitcake that would have been served as part of the Christmas holidays.

Her original recipe reads:
“Take 40 eggs divide the whites from the yolks & beat them to a froth then work 4 pounds of butter to a cream & put the whites of the eggs to it a Spoon full at a time till it is well work’d then put 4 pounds of sugar finely powdered to it in the same manners then put it in the Youlks [sic] of eggs & 5 pounds of flower [sic] & 5 pounds of fruit.  2 hours will bake it add to it half an ounce of mace & nutmeg half a pint of wine and some frensh [sic] brandy.”

Thankfully, the recipe that is given out and the one I baked is adapted for modern bakers.  The first step was soaking the candied fruit pieces and nuts in the Madeira for three hours.  The cake includes so much brandy and wine that when finished it was really moist and quite good.  The biggest change I had to make to the cake was using regular raisins instead of currants.  After several stores and an internet search, it was apparent that finding currants just wasn’t going to happen. 

  
French Brandy, Madeira, Candied Orange Peel, Citron, Lemon Peel & Raisins.
Soaking in the Madeira for at least 3 hours.

Also, I did not make the modern adaption of an 18th century icing that was part of the recipe.  I had on hand an extra bottle of rum icing that we put on the plum pudding we make on Christmas Eve.  To say that the cake turned out to be incredibly tasty is an understatement.  My daughters usually refuse to eat fruitcake—they don’t like the taste and texture of fruits in cakes.  However, Mrs. Washington’s Great Cake was a huge hit.  My usually picky eaters gobbled up every bite.

The cake ready to be baked and fresh out of the oven with icing.

Bon Appetite to baking your very own Great Cake and tasting a bit of history!
  

Recipe card from Mount Vernon

Monday, September 19, 2016

The Art of Fermentation: Everything Old is New Again

By Jeff Burns

One of the oldest methods of preparing food, found in cultures around the world, is fermentation.  The fermentation process has been used in beverage making since 7000-6000 BCE, in China, India, Georgia, Mesopotamia, Egypt, Central America, and throughout Africa and Asia.  All sorts of foods have been fermented including beans, grains, vegetables, fruits, meats, milk, fish, and tea. Fermented foods are an important part of the cuisines of many different cultures.  Lately, researchers have been touting the health benefits of fermented foods, citing their probiotic effects and vitamin enriched nature. 


We already make a lot of relishes and pickles, so we decided to try some fermenting with a couple of popular fermented foods:  sauerkraut and kimchi.  Both are fermented cabbage dishes.  Sauerkraut is mostly associated with German and eastern European cultures, while kimchi is Korean.  Sauerkraut immigrated to America along with German and eastern European immigrants in the 19th century. In the immigrant neighborhoods of cities across America, it quickly became a staple.  In the tenements of New York City in the late 1800s and early 1900s, men would go door to door with their cabbage cutting mandolins, shredding heads of cabbage for a penny each.  This saved the housewife time, labor, and space, and once she had her shredded cabbage, she could use her own family recipe to make the sauerkraut.  Our attempt turned out great.

Encouraged, we tackled the kimchi.  We found a recipe online, ordered a Korean spice mix, shredded, spiced, and then let fermentation take its course.  That’s one of the advantages of the process:  you just let nature take its course.  We jarred it, and a week and a half later, it was ready for tasting.  Another homerun!.  Now to find ways to use up jars of sauerkraut and kimchi.


Want to learn more about fermentation and maybe give it a shot yourself?  There are lots of websites full of information about the health benefits of fermented foods and recipes and how-to guides.  There are lots of books as well.  A great book to start with is The Art of Fermentation  by Sandor Ellix Katz, a James Beard Award winner (a big deal in the food world), considered a bible of fermentation.


Tuesday, March 22, 2016

Learning about History through a Traveling Military Exhibit

By Margaret Duncan, Ed.D.
Russ Vermillion, Lamar Scott, Buddy Simpson, Marty Potash


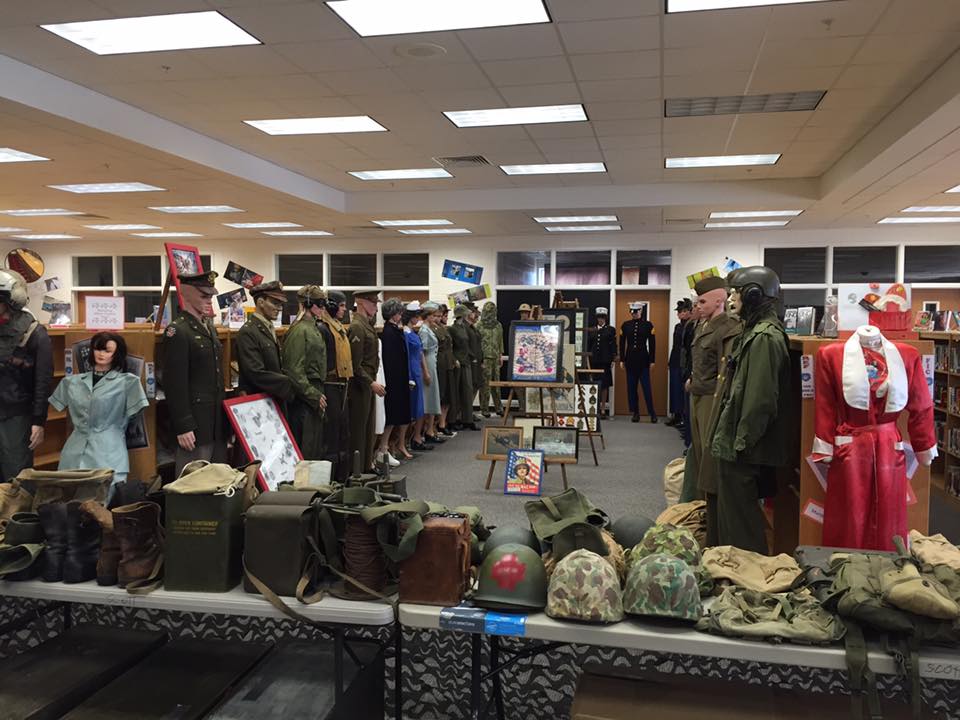
Recently, my school was lucky enough to host a traveling exhibit of historic military items ranging from World War I through Vietnam.  The exhibit contains items from the personal collection of two local Marine Veterans, Buddy Simpson and Lamar Scott.  They have been amassing the collection for over a decade and have been offering it to schools for the last six years, free of charge.  Not only do they set up the exhibit but they, along with fellow Veterans man the exhibit during the day.  Students get to see all the artifacts, and the Veterans are on hand to explain all the items and answer questions.  Plus they often tell stories to go along with the artifacts.


Vietnam Era Items
Picture of Lamar Scott as well as
helmet he wore in Vietnam
For our school, the exhibit was set up in our Media Center and occupied all available space possible.  Originally, we had booked the exhibit for one day, however, scheduling conflicts pushed it to two days.  Once the exhibit was set up, we were grateful for the mix up and happy to have the exhibit longer than originally planned.  The exhibit is so massive it takes a full day for set up and another for take down.  Over the course of two days, all World History and US History students were able to tour it.  However, the exhibit turned out to be so popular that by the second day, Geography and Government students were asking to go.  So, next year the plan is to expand to a full week and even create a community night so that students can bring their families to tour. 


Mannequins clad with uniforms from different eras. 

Mr. Simpson showing students items
 
“I started off with just a little bit of a collection. I went from a few shelves in the bedroom to a 6-by-12-foot trailer. And now we have an 8-by-20-foot trailer,” said Mr. Scott.  Really the collection is much larger than we had expected and the look on our faces when the Veterans first opened the trailer was priceless. However, as we helped unload and set up it was exciting.  Many of us enjoyed looking over the exhibit and holding many of the historical items.  For example, our AP Psychology teacher was able to flip through a book from World War II, Psychology and the Fighting Man.

 
Why amass so many artifacts and create a traveling exhibit?  According to Mr. Simpson, “We do it to teach students about history, if you forget your past, you have no hope for the future. We’re preserving history through wartime collection.” Indeed, student’s reaction to the exhibit was very positive.  For many students, this was the first time they had ever seen so many historical items, military or otherwise. 

For the length of the exhibit, Mr. Scott and Mr. Simpson were joined by fellow Veterans Russ Vermillion (Marines), Terry McClure (Army) and Marty Potash (Air Force).  All of the men volunteer their time helping show off the historic artifacts and engage students with stories and answering questions.  As a teacher, I have known Mr. Vermillion for over a decade as one of my annual Vietnam Veteran speakers. 

Authentic Tuskegee Airmen Uniforms


World War I Uniforms and Saddle
One of the stand out parts of the exhibit was the 56 mannequins on display.  Each mannequin was adorned in antique uniforms.  The uniforms are all authentic and show off the evolution of military dress over time.  One of the most talked about uniforms was the two Tuskeegee uniforms on display.  According to Mr. Scott, “The mannequins represent men and women that died for our freedoms.”

Mr. Simpson and Mr. Scott told us how they regularly receive donations from people who might otherwise toss the historic items in the trash.  Something very sad for a history teacher to hear.  Indeed, there was one photo from WWI that was given to them at a local mall.  The woman said she had planned on throwing it away if they didn’t take it.  Not only did they gladly take the photograph, Mr. Simpson then hand made a wooden oval frame for it to be displayed in. 


Variety of medicines.
World War II German items

The exhibit also contains dozens of cases, hand made by Mr. Simpson containing hundreds of items.  Artifacts ranged from WWI cavalry items to flasks to medical supplies to war medals to money to disabled weapons.  Mr. Scott was able to show off the discontinued miniature cigarette brands and lighters as well as the still-thriving personal hygiene products used in their grandparents’ and great-grandparents’ generations. Other great curiosities included a saddle from WWI, an Army issue portable phonograph player, a typewriter, huge walkie-talkies and the wire and phones from WWI. 

I have told all my teacher friends at other schools all about the exhibit.  It was a wonderful week and I look forward to my school hosting it each year.  It really was exciting to have a mini-museum in our school, if even for just a few days.


Sunday, January 24, 2016

Recreating History with a Pre-Prohibition Pilsner

By David Duncan

Do you like Beer and History? How about combining the two?  As a home brewer, I have been experimenting with beer recipes for quite some time.  I am by no means a master brewer rather a guy who loves beer—drinking it, as well as brewing it.  This is my second attempt to brew a historical recipe. My first attempt was a 1744 Porter.

When it comes to beer, I am all about basic home brewing.  So, I embraced the idea of recreating a Pre-Prohibition Pilsner.  There are many recipes available and the one that I settled on claims to be from the Sieben’s Brewery in Chicago when it was claimed to be owned by Al Capone.  While there is no proof Al Capone owned the brewery or that the recipe is from the brewery, it is consistent with how Pilsner’s were brewed prior to Prohibition.  As a home brewer, I am not yet comfortable with all-grain or full mash brewing.  Therefore, I had the recipe converted to a partial mash.   


Pilsner Recipe from Chicago 1924
Partial Mash
• 6 lbs. Pilsner DME
• 2 lbs. rice syrup solids
• 1/2 lbs. malto dextrin

The brewing of the Pilsner followed the standard process of crafting beer. However, considering there were no crushed grains, the first step of combining the Pilsner DME, rice syrup solids and malto-dextrin was the only major step to perform. All ingredients were put into the water that we were careful not to allow the temperature to rise about 165 degrees Fahrenheit. This process is historically the same, as it removes the starch and releases the enzymes, and at this point it is now wort (beer). Wort is the liquid extracted from the mashing process during the brewing of beer and contains the sugars that will be fermented by the brewing yeast to produce alcohol.

After all the malt extract and syrup solids were added, we brought the wort to a boil for ninety minutes. The malt extract gives the beer its body and adds additional sugars. Then the hersbrucker hops were added. Hops are used primarily as a flavoring and stability agent in the beer, but they are also used for aroma. In the end, hops balance the sweetness against the bitterness of the beer.

The wort was then quickly cooled to 70 degrees Fahrenheit, and three gallons of water added to the wort.  The yeast was then added to the beer which converts the sugars to alcohol and carbon dioxide.  At this point a sample was taken to determine the original gravity which measured at 1.043.

The beer was allowed to ferment for seven days when it was then transferred to a secondary container to allow fermentation for an additional two weeks. This step is called the two-stage secondary fermentation process and allows the beer to have more clarity and an overall better, purer flavor.

After two additional weeks, we started the bottling process. The Pilsner was transferred to a bottling bucket and priming sugar added.  When bottling, we always dissolve the priming sugar into two cups of boiling water. The priming sugar adds carbonation to the Pilsner.  At this point, another sample was taken and the final gravity was recorded at 1.012.

Although I was attempting to recreate a 1924 Pre-Prohibition Pilsner, we did use modern ingredients and equipment to make it.  However, I judge the intent to be as important as the authentic historical concept.  So, what is a Pre-Prohibition Pilsner?  Pilsner is a type of pale lager. It takes its name from the city of Plzeň in the Czech Republic, where it was first produced in 1842.  In the US, the Pilsner was brewed by German immigrants using a six-row barley which had a higher tannic acid and protein content and greater husk per weight than in Europe.  Rice gained popularity in the brewing of Pilsners due to grain rationing when most breweries began using it as a filler.

For a second attempt at recreating a historic beer, we are once again happy with the results.  The Pre-Prohibition Pilsner has a great aroma and color and based on friend’s reactions, it really hit the tasting mark.  I would heartily recommend this recipe to fellow home brewers.  It was definitely well worth it!

The original recipe from Brewery.org
Full Mash Ingredients
6 lbs. six-row lager malt
•2 lbs rice (ground)
•1/2 lbs soy grits ( from health food store )
•1 1/2 oz Hersbrucker 6% alpha-acid
• 1/2 oz - Hallertauer 5% alpha-acid
•1/8 oz Hersbrucker 6% alpha-acid
•1/2 oz of Hallertauer
•Red Star lager Yeast

Step by Step:
1. Cook rice in 1 gallon plus 3 cups water for 30 minutes.
2. Preheat mash tun and add 1 3/4 gallons of 120˚F water.
3. Adjust rice temperature to 190˚F with 1 gallon of hot water.
4. Add rice to mash tun and immediately mash in malt and soy grits.
5. The temperature should end up between 150 and 155˚F.
6. Hold at 150-155˚F for 1 hour and 30 minutes.
7. Sparge with 165˚F water to collect 5 1/2 gallons of wort.
8. Boil wort for 1 hour using the following hop schedule:
• 60 minutes - 1 1/2 oz. of 6%     alpha-acid Hersbrucker
• 30 minutes - 1/2 oz. of 5%   alpha-acid Hallertauer
• 10 minutes - 1/8 oz. of 6%   alpha-acid Hersbrucker
9. Add 1/2 oz. of Hallertauer after turning off the boil and cover brew kettle.
10. Cool to 55˚F.
11. Pitch with about 14 grams Red Star lager Yeast (remember this is 1924).
12. Ferment & Condition at 55˚F.
13. O.G. - 1.040, T.G. 1.010
14. Bottle with 3/4 - 1 cup of priming sugar.

Wednesday, November 4, 2015

The Great Thanksgiving Listen

By Jeff Burns

I have large southern families on both sides.  My father is one of 10 siblings, and while my mother only had one brother, her mother was the oldest of eleven, and their ages were such that she basically grew up as a sibling, not a niece.  Both of my parents are now deceased. Just recently, I served as a pallbearer for my 95 year old uncle, the last of my father’s generation.  My mother’s younger brother died this summer, and of the eleven in my grandmother’s generation, three survive.

 The Burns siblings (9 of them anyway), with my father on the far right. 
It is the only photo of all or almost all that I have. Taken 1984

My mother’s grandparents and their 11 children. 
My grandmother is on the far right.
Only known picture of them all together.Taken 1946.

Although we often had family reunions and were closer than many families, I don’t have much from my grandparents and beyond. They were generally poor working people just getting by, farmers and sharecroppers.  They didn’t have much in the way of belongings to pass down, and they weren’t great picture-takers or letter-writers or diarists. As an adult and especially as a history teacher, I regret that I didn’t engage them more about their lives and memories, and I bet most readers of this blog have similar feelings.

We recently shared a post on Facebook about a new initiative launched by StoryCorps called The Great Thanksgiving Listen, encouraging people to engage and interview their elders during the holiday season this year.  This is a great idea.  Give it a try.  Whether you submit the results to StoryCorps or not, you will learn something.  And don’t think it’s just for Thanksgiving.  You can do it anytime, with relatives, neighbors, or anyone else.  So, get out and DO history!

Monday, October 26, 2015

Repurposing Vintage Objects into Something New

By Jeff Burns

They are as much a part of fall as football, pumpkins, and turning leaves: Fall Festivals.  Nearly every weekend, schools, churches, and communities host festivals, and craftspeople and vendors come from all over to sell their handiwork. 

If you are a fan of history like we are, you are probably a fan of old things and of repurposing old things.  Fall festivals are a great place to discover repurposed things, vintage objects transformed into something else for your home or something to wear, or things made to resemble vintage things. Here are a few things we’ve seen in our area festivals this fall.

 
I’ve previously blogged about my wife’s craft, Patchwork Revival. We find vintage fabrics and unfinished quilt tops and squares at estate sales and other places, and she makes them into placemats, potholders, table runners, teddy bears, and bags among other things.  At every festival and show, we run into people who have something started by a grandmother but never finished.  These are fabrics from the 1930s to the 1960s and even earlier.

 
Bottle trees fashioned from rebar. While it’s not necessarily repurposing, it’s an old idea.  Bottle trees or “haint” trees have been around for ages and have an interesting History. The idea is that old bottles are put on tree branches to frighten and trap evil spirits.

 
Another vendor offered angels made out of old hymnals.


Photo and poster reproductions become new home décor.

 
Colorful baskets made in the traditional Gullah/Geechee/Low Country style that was brought from Africa
 

Chimes made from vintage silverware and from old glass bottles


New cloche hats, 1920s flapper style

These are just a few of the great finds in my area. Go out and explore yours, and enjoy a few funnel cakes on the way!

Wednesday, October 7, 2015

Discovering All Things Japan at JapanFest Atlanta

By Margaret Duncan, Ed.D.
Domo (NHK Mascot)

“Youkoso Nihon E.” Welcome to Japan!

Maneki-neko (Lucky Charm)
Every year JapanFest takes place in the northern suburbs of Atlanta.  This is a great festival that allows visitors to learn about all things Japan, from history to anime to culture to cuisine.  At JapanFest, visitors can really get a close up look at Japanese culture by sampling authentic Japanese food, playing games, viewing martial arts demonstrations, attending traditional performances and workshops.  Attendees can also buy plenty of items from collectables to art to nick-knacks to food to Anime.  As a parent of girls who love Anime (Japanese animation) and all things associated with Japanese culture, attending JapanFest has been an activity we look forward to each and every year.

 Murata Boy Bicycling Robot                                                

At its core, JapanFest is all about improving the understanding and appreciation between the Japanese people and Americans.  As such, the festival is a two day celebration that promotes multicultural education.  Indeed there are a number of stages and workshops that show off various aspects of the Japanese culture.  During the weekend, I had a chance to learn about Sake in Sake 101, learn about making sushi, learn the different aspects of Japanese cuisine from an award winning chef, and sample quite a bit of Japanese food and drinks. 

 
In order to showcase a variety of performing arts, JapanFest has several stages that offer a number of performances and demonstrations.  Attendees can view a Taiko Brum show.  Taiko Brum is a broad range of Japanese percussion instruments played as an ensemble. We also watched a Samurai show—and even learned to be a Samurai at a boot camp.  The various stages also hosted an acrobatic top spinning, jazz guitar and J-Pop performances.  J-Pop is the mixing of traditional Japanese music with foreign pop and rock music.  It can also have heavy Anime ties. We also had the chance to traditional archery, try on traditional dress (kimono) and paint a Hakata (traditional Japanese clay) doll.

                          J-Pop Performer Junko Fujiyama         Jazz Guitarist Hiroya Tsukamoto
 
JapanFest has always had an anime element with vendors and a video room.  Initially, this is why we started attending the festival years ago.  However, this year the festival partnered with MomoCon, the fastest-growing anime convention in the country, to create an Anime Village. Within the village you could shop for all types of anime products, Japanese snacks and drinks.  Visitors could even play a variety of Japanese video games and/or participate in a number of cosplay events.  The Anime video room was expanded and not only offered a lot of anime to watch, but there was also trivia contests with giveaways. 

Re-Discover Japan Street & Celebration
 
The addition of the Anime Village allowed for visitors to be spread out over more area.  No doubt the festival was still congested in areas but it was manageable.  The village also allowed for new vendors in the exhibit hall.  New this year was a Re-Discover Japan Street.  This area allowed for several Japanese cities and traditional arts to be showcased. Overall, there was such a variety at the festival that there was plenty to do for all visitors, no matter the age or interest!